概述
本文基于 pytorch-pretrained-BERT(huggingface)版本的复现,探究如下几个问题:
- pytorch-pretrained-BERT的基本框架和使用
- 如何利用BERT将句子转为词向量
- 如何使用BERT训练模型(针对SQuAD数据集的问答模型,篇幅问题,可能下篇再写)
因为已经有很多文章对BERT的结构和效果做了详尽的介绍,所以对于模型的效果和结构就不在这里赘述了。
基本框架和使用
环境
首先,利用pip安装包:
1 pip install pytorch-pretrained-bert
这种安装方法可能会导致一个编码问题,具体细节可以参考这里。作者已经把这个错误改了过来,但是没有发布新的版本(当前版本为0.1.2),因此需要我们先从github上下载源码,然后安装:
1 pip install [--editable] .
结构
Google提供了6种预训练的模型,具体细节如下:
bert-base-uncased: 12-layer, 768-hidden, 12-heads, 110M parametersbert-large-uncased: 24-layer, 1024-hidden, 16-heads, 340M parametersbert-base-cased: 12-layer, 768-hidden, 12-heads , 110M parametersbert-base-multilingual: 102 languages, 12-layer, 768-hidden, 12-heads, 110M parametersbert-base-chinese: Chinese Simplified and Traditional, 12-layer, 768-hidden, 12-heads, 110M parameters
作者对于每个预训练的模型都提供了6个model类和3个tokenizer类供我们使用。具体的模型简介和参数可以参照这里README中pytorch model和Tokenizer部分。
1    tokenizer = BertTokenizer.from_pretrained('bert-base-uncased')
2    model = BertModel.from_pretrained('bert-base-uncased')
初始化
上面就是对model和tokenizer进行初始化的代码,“BertTokenizer”和“BertModel”可以替换为自己需要的模型和分词器,后面函数的参数对应6中预训练的模型。由于是预训练的模型,所以肯定是要下模型和词表的,作者把资源放到了亚马逊的云上,链接写在了一个环境变量里,如果第一次使用,要提前下载,下载后的文件存放在cache文件夹:~/.pytorch_pretrained_bert/下。
1    PRETRAINED_MODEL_ARCHIVE_MAP = {
2        'bert-base-uncased': "https://s3.amazonaws.com/models.huggingface.co/bert/bert-base-uncased.tar.gz",
3        'bert-large-uncased': "https://s3.amazonaws.com/models.huggingface.co/bert/bert-large-uncased.tar.gz",
4        'bert-base-cased': "https://s3.amazonaws.com/models.huggingface.co/bert/bert-base-cased.tar.gz",
5        'bert-base-multilingual': "https://s3.amazonaws.com/models.huggingface.co/bert/bert-base-multilingual.tar.gz",
6        'bert-base-chinese': "https://s3.amazonaws.com/models.huggingface.co/bert/bert-base-chinese.tar.gz",
7    }
不知道其他人下载情况如何,反正在我这边利用requeset去下就很慢,所以肯定是想提前下好,然后放过去的。这是我踩的一个大坑。在Folx上下好模型后,我欣喜的关掉了那个贼慢的python程序(虽然显示已经下了一半了),一波美滋滋的拷贝之后,发现并没有卵用,它并没有识别我下好的文件,又重新开始request了。只能先让它慢悠悠的下着,看看下下来的东西是啥,然后去读读源码。
后来发现大概的流程是这样的,它会把文件先下到一个tmp文件夹中,然后复制到cache文件夹下。(但我已经把资源放到里面了啊,并无卵用!)在读代码的同时,tokenizer的东西下好了,经过代码和文件的双重验证:它会把链接名和一堆烂七八糟的tag加起来做MD5,然后作为文件名,过程很复杂,看不太懂。
经过再一次深入的阅读,我发现了它大概的流程:它会先判断 from_pretrained 函数的参数,如果是上文中 PRETRAINED_MODEL_ARCHIVE_MAP 已有的,就会去cache里找;如果不是,就会判断它是不是一个路径,会在这个路径下找需要的文件,一个config文件和一个bin文件,正好和我们下载的文件对应。
 1    """
 2    Params:
 3    pretrained_model_name: either:
 4    - a str with the name of a pre-trained model to load selected in the list of:
 5    . `bert-base-uncased`
 6    . `bert-large-uncased`
 7    . `bert-base-cased`
 8    . `bert-base-multilingual`
 9    . `bert-base-chinese`
10    - a path or url to a pretrained model archive containing:
11    . `bert_config.json` a configuration file for the model
12    . `pytorch_model.bin` a PyTorch dump of a BertForPreTraining instance
13    *inputs, **kwargs: additional input for the specific Bert class
14    (ex: num_labels for BertForSequenceClassification)
15    """
16
接下来的操作就简单了,直接贴代码:
1    UNCASED='./bert-base-uncased' # your path for model and vocab
2    VOCAB='bert-base-uncased-vocab.txt'
3    tokenizer=BertTokenizer.from_pretrained(os.path.join(UNCASED,VOCAB))
4    model = BertModel.from_pretrained(UNCASED)
需要注意的是,Tokenizer需要的是词表,我们看到的model需要的是文件,词表的链接如下:
1    PRETRAINED_VOCAB_ARCHIVE_MAP = {
2        'bert-base-uncased': "https://s3.amazonaws.com/models.huggingface.co/bert/bert-base-uncased-vocab.txt",
3        'bert-large-uncased': "https://s3.amazonaws.com/models.huggingface.co/bert/bert-large-uncased-vocab.txt",
4        'bert-base-cased': "https://s3.amazonaws.com/models.huggingface.co/bert/bert-base-cased-vocab.txt",
5        'bert-base-multilingual': "https://s3.amazonaws.com/models.huggingface.co/bert/bert-base-multilingual-vocab.txt",
6        'bert-base-chinese': "https://s3.amazonaws.com/models.huggingface.co/bert/bert-base-chinese-vocab.txt",
7    }
利用BERT获取词向量
作者其实在README中的 Usage给出了将句子转为词向量的demo,但是有点简略。同时,作者在extract_features.py中提供了详细的使用方法,接下来的内容就是对这里面的代码进行解读了。
因为Usage中的注释已经很详细了,所以接下来重点关注两个点:
- 如何批量处理(将文件中的句子转为词向量)
- 获得的词向量结构如何,是模型的哪个部分的输出
批量处理
1    layer_indexes = [int(x) for x in args.layers.split(",")]
2    tokenizer = BertTokenizer.from_pretrained(args.bert_model)
3    examples = read_examples(args.input_file)
4    features = convert_examples_to_features(
5        examples=examples, seq_length=args.max_seq_length, tokenizer=tokenizer)
6    unique_id_to_feature = {}
7    for feature in features:
8        unique_id_to_feature[feature.unique_id] = feature
9    model = BertModel.from_pretrained(args.bert_model)
其实处理的流程很简单,就是读入文件,然后将其转为需要的格式(InputFeatures类),然后利用模型进行处理。重点在于文件读取的函数中:
 1    def read_examples(input_file):
 2        """Read a list of `InputExample`s from an input file."""
 3        examples = []
 4        unique_id = 0
 5        with open(input_file, "r") as reader:
 6            while True:
 7                line = convert_to_unicode(reader.readline())
 8                if not line:
 9                    break
10                line = line.strip()
11                text_a = None
12                text_b = None
13                m = re.match(r"^(.*) \|\|\| (.*)$", line)
14                if m is None:
15                    text_a = line
16                else:
17                    text_a = m.group(1)
18                    text_b = m.group(2)
19                examples.append(
20                    InputExample(unique_id=unique_id, text_a=text_a, text_b=text_b))
21                unique_id += 1
22        return examples
最关键的部分就是13行的那个正则表达式,模型中对于文本会分成两部分,part A 和 part B。在这个函数中,将两个部分的文本以“ ||| ” 分割(注意前后有空格),所以文件中的每一行应该是“I love you ||| Hello world”这样。
词向量结构
 1    all_encoder_layers, _ = model(input_ids, token_type_ids=None, attention_mask=input_mask)
 2    all_encoder_layers = all_encoder_layers
 3
 4    for b, example_index in enumerate(example_indices):
 5        feature = features[example_index.item()]
 6        unique_id = int(feature.unique_id)
 7        # feature = unique_id_to_feature[unique_id]
 8        output_json = collections.OrderedDict()
 9        output_json["linex_index"] = unique_id
10        all_out_features = []
11        for (i, token) in enumerate(feature.tokens):
12            all_layers = []
13            for (j, layer_index) in enumerate(layer_indexes):
14                layer_output = all_encoder_layers[int(layer_index)].detach().cpu().numpy()
15                layer_output = layer_output[b]
16                layers = collections.OrderedDict()
17                layers["index"] = layer_index
18                layers["values"] = [
19                    round(x.item(), 6) for x in layer_output[i]
20                ]
21                all_layers.append(layers)
22                out_features = collections.OrderedDict()
23                out_features["token"] = token
24                out_features["layers"] = all_layers
25                all_out_features.append(out_features)
26                output_json["features"] = all_out_features
27                writer.write(json.dumps(output_json) + "\n")
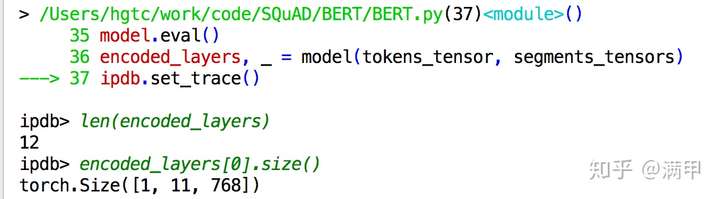
19行得到的是一个list,长度为网络的层数,每个元素是[batch,sequence,embedding]的向量。
对于每个序列,序列中每个向量的token,分别获取它相应层(由参数arg.layers控制,本文中是最后四层)的编码。最后对于每个序列中的每个token会获取到[layer,dimension]大小的向量作为features。